There has to be a bit of background information so if you are in hurry then jump to Dual Boot Ubuntu on HDD and SSD section.
I was wondering about how much time do we waste on installing softwares on windows. We continue to do this until we realise that we have lost all the time.
Don’t worry, this happened with me too. Since, most of my projects were already setup on windows, I found it difficult to switch because I had to do the settings once again. On being pushed more I decided to switch to WSL because that was a more comfortable option but till when? Duh… 7-8 months.
I was literally frustrated with using WSL because of two major reasons -
- Its exponentially increasing size (that obviously took a lot of disk space).
- Its increasing loading time.
So yesterday I decided to switch back to Ubuntu and guess what? Today I am here writing this blog on ubuntu with all my java, cpp, shell, ruby and python programs running successfully. Fast, isn’t it ? I suppose that’s because I learn’t a lot of CLI commands while using WSL ;-)
I really love it…. I mean working with WSL can sometimes be a serious pain because of lots of installation conflicts but with Linux I feel like living a dream life. I installed Ubuntu on two PCs actually because I could not test the installation directly on my PC(I left my hardisk at college and had to search for a safe option). So, I took my brother’s PC for testing. Well this is a lot of detail…now let’s directly dive into the installation steps.
Dual Boot Ubuntu on HDD and SSD
Why do PCs have HDD and SSD ?
Here’s the scenario: you got a new computer. It comes with a SSD with limited disk space like 120 GB and an additional HDD with 500 GB or 1 TB disk space. This is usually the scene with gaming laptops where large disk space matters for storing game files but SSD is required for faster boot and computing experience.
Now, if you want to dual boot on a system with two disks, you may get confused about where should you be installing Linux.
You have three options:
- Install Linux completely on the SSD. You’ll get full advantage of SSD speed, but then you will have only a limited disk space.
- Install Linux completely on the HDD. You’ll have plenty of disk space, but Linux will boot slower, and you won’t get the SSD advantage.
- A compromise between SSD and HDD. You keep the root (and thus swap and boot) on SSD and you put your Home directory on HDD. This way, you boot faster into Linux and you have plenty of disk space for your personal documents and downloads.
I went for the 3rd Option and this is what I am going to tell you.
Prerequisites
Here are the things you need in this tutorial:
- A computer that comes preinstalled with Windows 10 and has both an SSD and an HDD.
- A USB key (pen drive or USB drive) of at least 4 GB in size and no data on it.
- Internet connection (for downloading Ubuntu ISO image and live USB creating tool).
- Optional: External USB disk for making back up of your data.
Step 1: Make backup of your data
Since you’ll be dealing with disk partitions, it will be wise to make a copy of your important files on an external disk. This is optional but having a backup is always a good idea.
Step 2: Make disk partition for Ubuntu installation
In the Windows menu, search for disk and go to ‘Create and format hard disk partitions’. You’ll see both SSD and HDD here. You have to shrink both SSD and HDD one by one and make some free space that will be utilized later for installing Ubuntu Linux.
Right click on the SSD and choose Shrink Volume option.
It will give you the largest possible disk partition you can make here. Don’t use it all. Leave some extra space for Windows. I have given it 30 GB which is a decent disk space for the root partition. Anything between 20 and 40 GB is a fair choice.
Step 3: Download Ubuntu
Download Ubuntu Desktop
Go to Ubuntu’s website and download the ISO file. If you need to download Ubuntu via torrents, you can find it under the ‘alternative downloads’.
Step 4: Create bootable Ubuntu USB
You can easily create bootable Ubuntu USB in Windows, Linux and macOS. Since the focus here is on Windows, you can use a Windows specific tool like Rufus. Etcher is also a good tool in this regard.
Download Rufus from its website.Plug in your USB. Make sure it doesn’t have any important data because it will be formatted.
Run the Rufus tool. It automatically identifies the plugged in USB but double check it anyway. Then browse to the location of the downloaded ISO image and ensure that it uses GPT partitioning scheme and UEFI target system.Hit the start button and wait for the process to complete. Once you have the live Ubuntu USB ready, the next step is to boot from it.
Step 5: Boot from the live USB
You may choose to access the UEFI settings when the system starts by pressing F2/F10/F12 button but a more robust way is go through Windows.
- In the Windows menu, search for UEFI and then click on ‘Change advanced startup options’.
- Under the Advanced startup option, click on Restart now button.
- On the next screen, click on ‘Use a device’.
- Recognize the USB disk with its name and size. It may also be displayed as EFI USB Device.
- Now it will power off your system and reboot into the disk you chose which should be the live USB disk.
Step 6: Installing Ubuntu Linux
Now that you have booted from the live USB, you may start the installation procedure. The first few steps are simple.
- You choose the language and keyboard.On the next screen, choose Normal installation. No need to download updates or install third-party software just yet. You may do it after installation completes.
- After some time you’ll see the Installation type screen. Here, opt for ‘Something else‘ option.
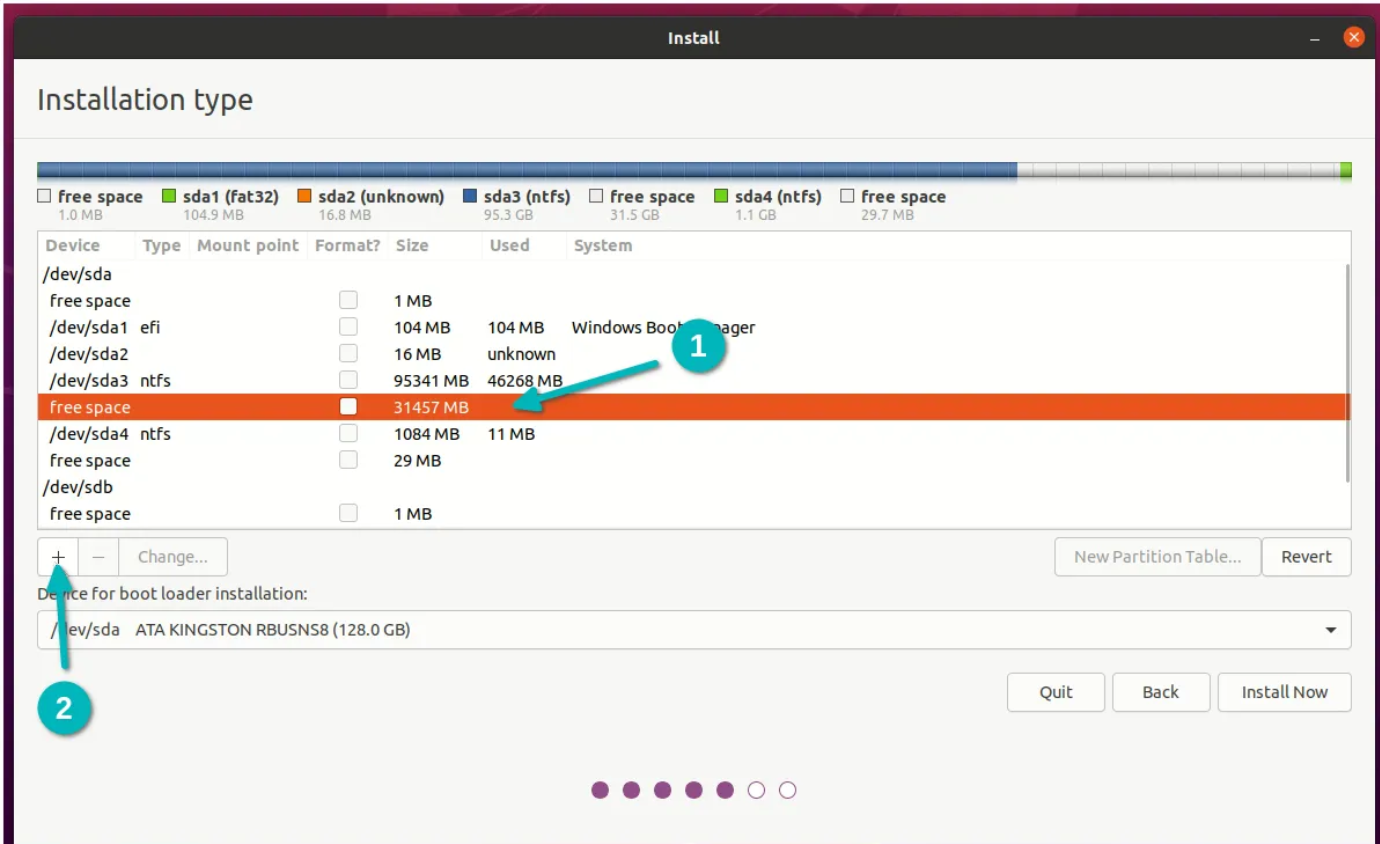
- You should see the free space you had created earlier on the next screen. Select the free space created on SSD (you can guess by its size if nothing else) and click on the + sign to use this free space.
Note : These are sample images, not of my PC.
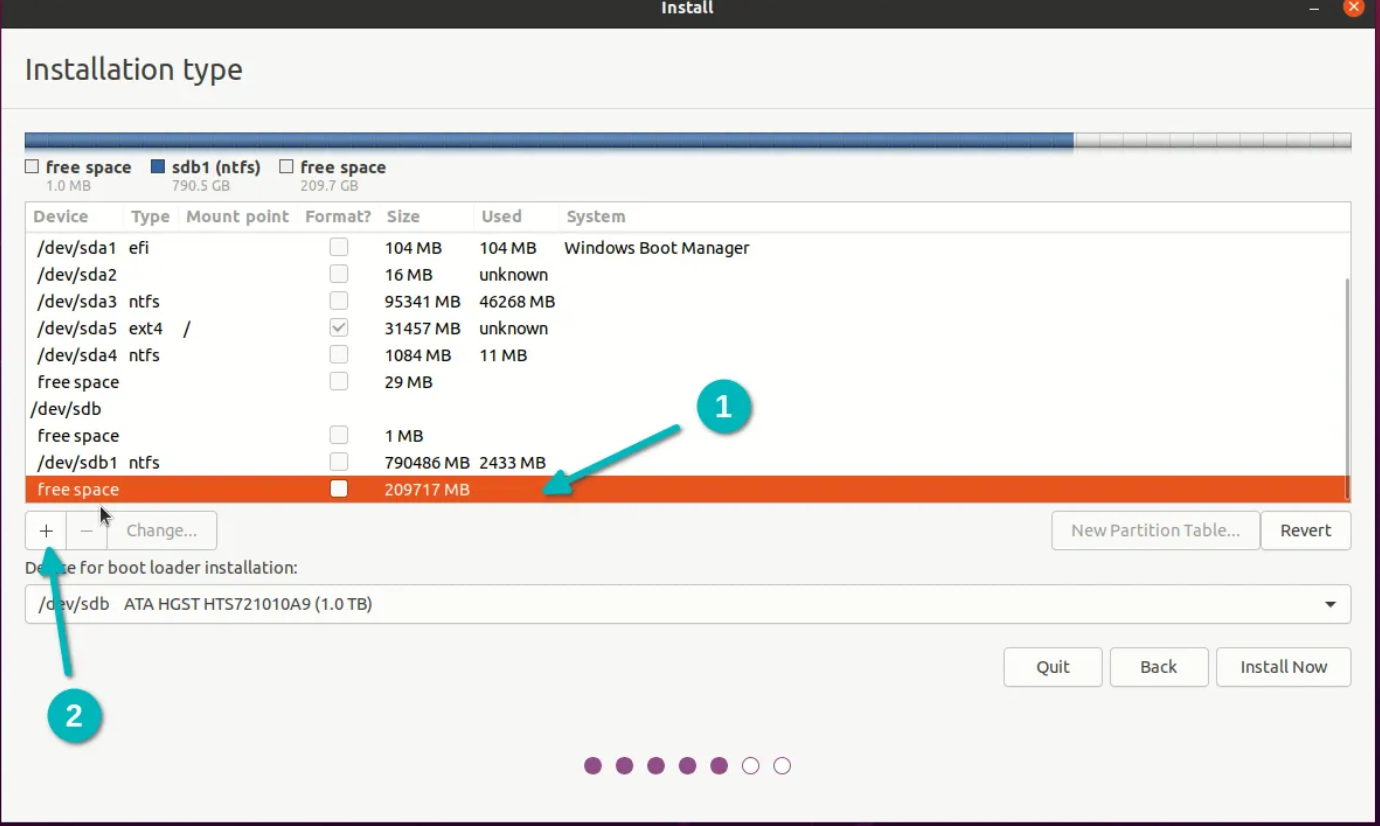
By default, it will take the entire free space which is a good thing. Keep the partition type primary. What you need to change is the file system type to Ext4 and mount point to / (/ means root in Linux).

Now, select the other free space on the HDD and click the + sign.
This time choose Home as the mount point. Partition remains primary and file type ext4.
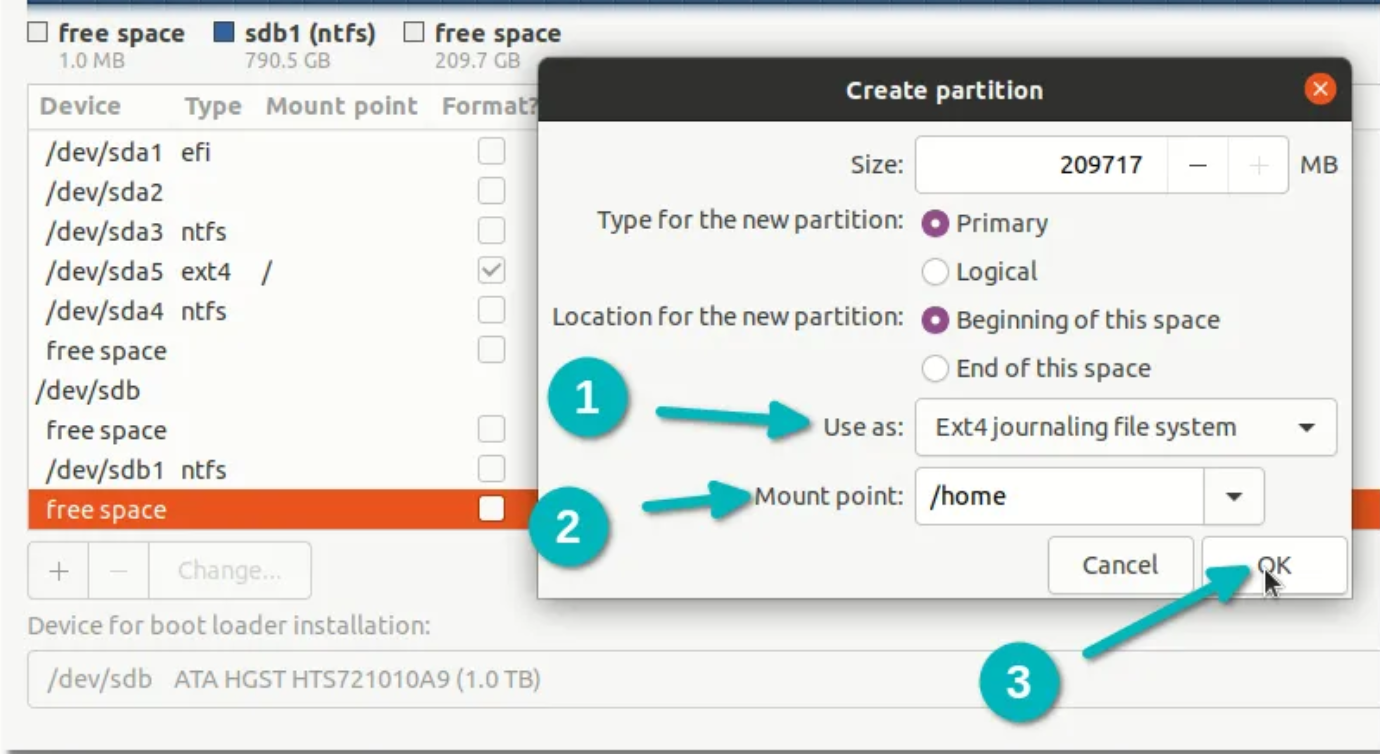
You don’t need to worry about ‘Device for boot loader installation’. You have a pre-installed Windows UEFI system. You should have an EFI partitioning (ESP) already (for me it’s 100 MB partitioning with type efi). The Ubuntu installer is intelligent and can automatically detect this partition and use it for Grub bootloader.
If everything looks good, hit the Install Now button.
- Things are pretty straightforward from here. Select a timezone.
- Enter a username, computer’s name, i.e. hostname and an easy to remember password.
- Now wait for like 7-8 minutes for the installation to finish.
- Restart the system when the installation finishes.
- You’ll be asked to remove the USB disk. Remove the disk and press enter.
If things go right, you should see the black or purple grub screen with option to boot into Ubuntu and Windows.
That’s it. You can now enjoy both Windows and Linux on the same system with SSD and HDD. Nice, isn’t it?
I hope this blog was helpful for you. If you still have questions or if you are facing any issues, please let me know in the comments section, and I’ll try to help you out.